![]()
![]()
![]()
![]()
![]()
![]()
![]()
API Verification
The end goal was to have our API replace SSH’s user name / password pair but due to time constraints – this has been put off to future works. To test our API, we developed a simple toy system. Our toy system uses the iPAQ H5550 as both clients and servers. Servers store files containing finger print data named after the corresponding user. In order for a client to authenticate itself, it sends a user name and finger print pair to the server. The server opens the user’s file (based on the name provided by the client) and verifies that the passwords match. If the user name and password were valid, the server grants access to the requested resources.
Our test system consists of three applications: (1) a client, (2) a server, and (3) a create user program:
The CreateUser application uses the WriteToFile function from our API. Its purpose is generating user files. In our system, the files’ names correspond to the user name. See figure 1 for a screen shot. The simple application consists of a place to write in a user name, and a button to begin the user creation process. After a user name is typed in – pressing the add user button results in the following:
- User: Type in user name.
- User: Press add user button.
- System: Message box appears asking for a finger swipe.
- User: Clicks “OK” and swipes finger
- System: Message box appears asking for a finger swipe
- User: Clicks “OK” and swipes finger
- System: Writes data to file
Since this program is essentially the equivalent of the Linux passwd command, we decided the same safety measures should be taken. A new password is always verified in the event that something was mistyped. In our system – a finger print if verified to ensure everything was read correctly. If the finger prints do not match, the process starts again at step 2. Michael Noeth wrote this application.
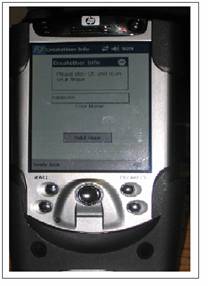
Figure 1: Screen shot of the CreateUser application.
The Client application uses the WriteToSocket function from our API. Its purpose is to attempt authentication with the server. See figure 2 for an idea of how the GUI is laid out. At the top, there are two input boxes where the user can specify the server’s IP address and their user name. There is a status bar at the bottom which indicates what is currently happening in the authentication process. Once these have been filled out, the client follows these steps to authenticate:
- User: Type in server IP address.
- User: Type in user name.
- User: Click “Connect to Server” button.
- System: Message box appears asking for a finger swipe.
- User: Swipes finger.
- System: Sends finger print to server.
- System: Waits for ACK or NOACK and displays status.
Since this program is essentially the equivalent of the SSH client, our goal was to simulate this as closely as possible. In an SSH client, a user must specify their user name and the target host. Once this is done, the client attempts to connect with the server. At this point, authentication takes place. In the SSH client, this would be done by password. In our client application, this is now done by finger print. The server responds with whether the authentication was successful or not. If the authentication fails, you can begin again at step 3. Jyothish Varma wrote this application.
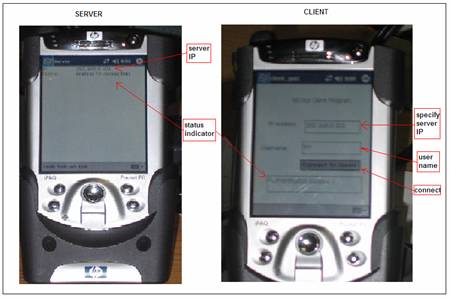
Figure 2: Screen shot of Client and Server applications
The Server application uses the ReadFromSocket and ReadFromFile functions from our API. Its purpose is to attempt authentication clients. See figure 2 for an idea of how the GUI is laid out. At the top, are two status indicators: (1) the IP address and (2) a connection status indicator. The server opens up a socket and waits to accept connections. When a connection is present, the server does the following:
- Accepts connection.
- Receives target user’s name over the open socket.
- Opens corresponding finger print file (file name is the same as the user name).
- Receives finger print over the open socket.
- Compares stored finger print with client’s finger print.
- Sends back status (i.e. whether the finger prints matched or not).
Since this program is essentially the equivalent of the SSH server, our goal was to simulate this as closely as possible. The SSH daemon on the server waits for connections and follows essentially the same procedure as our toy server application. The only difference is in the authentication method. Rather than verifying a user password from /etc/passwd and /etc/shadow, the new authentication uses the finger print files. Michael Noeth wrote this application.